


Curing weed is a crucial step in cannabis cultivation that enhances flavor, aroma, and potency while extending shelf life. This quick guide will walk beginners through a simple, step-by-step process to properly cure weed for the best possible results.
Table of Contents
What is Cannabis Curing?
Cannabis curing is the controlled process of preserving and enhancing harvested cannabis buds after the initial drying phase. By slowly removing excess moisture in a stable environment, curing allows chemical processes to continue within the buds, improving their flavor, aroma, and potency.
Properly cured weed delivers a smoother smoking experience, resists mold growth, and can be stored for longer periods without losing quality.
How to Cure Weed
Curing weed properly is essential to bring out the best in your cannabis flower. Follow this simple step-by-step guide to ensure your buds are flavorful, potent, and ready for long-term storage.
1. Harvest and Trim the Buds
Start by harvesting your cannabis plants when the trichomes are at their peak. Trim away large fan leaves and choose between wet trimming or dry trimming depending on your preference. Wet trimming involves removing sugar leaves before drying, while dry trimming is done after the drying process.
2. Begin the Drying Process
Hang the trimmed buds upside down in a drying room with good airflow, low light exposure, and stable temperature and humidity levels. Aim for a temperature around 60–70°F and relative humidity of 50–60%. Use drying racks if needed. This phase usually takes 7–10 days until the buds feel dry to the touch but are not brittle.
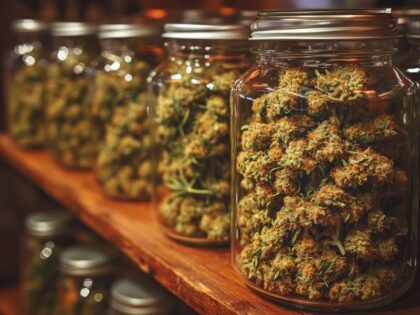
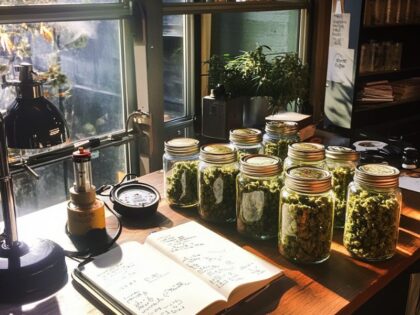
3. Transfer to Curing Containers
Once properly dried, place the buds in airtight containers such as glass jars. Avoid plastic containers, as they can affect taste and may release harmful chemicals. Fill each curing jar about 75% full to allow fresh air circulation and prevent mold growth.
4. Monitor and Maintain Humidity
Check the containers daily for the first 1–2 weeks. Open the jars (“burping”) for a few minutes to release moisture and refresh the air. Use humidity packs and hygrometers to maintain optimal humidity levels between 55–65%. This helps create a slow cure and prevents excess moisture buildup.
5. Cure for the Proper Duration
The curing period typically lasts 2–4 weeks, but some growers extend it up to 8 weeks or longer for premium results. Keep the jars in a dark place with a controlled environment, avoiding light exposure and fluctuating temperatures. During this time, aromatic compounds develop, enhancing the flavor, aroma, and potency of the cannabis buds.
6. Store for Long-Term Use
Once your buds are properly cured, they should feel slightly spongy, smell rich, and burn smoothly. Store the cannabis in sealed glass jars in a dark environment to maintain freshness. Properly cured and stored marijuana buds can retain their quality for months, offering a smooth smoking experience every time.
Benefits of Weed Curing
Curing cannabis is more than just a preservation step—it significantly improves the quality and overall experience of the final product. Here are the key benefits of curing your weed properly:
- Enhanced Flavor and Aroma: A slow cure allows aromatic compounds like terpenes to fully develop, giving your cannabis buds richer, more complex scents and tastes.
- Smoother Smoke: Curing reduces harsh compounds such as chlorophyll and residual nutrients, resulting in a smoother, less irritating smoking experience.
- Increased Potency: Proper curing continues the breakdown of leftover sugars and converts cannabinoids, boosting the potency of your marijuana buds.
- Longer Shelf Life: Properly cured and stored cannabis can maintain its quality for months, avoiding mold growth and degradation over time.
- Improved Appearance and Texture: Cured buds retain their shape, color, and texture better, preventing them from becoming overly dry or crumbly.
- Safer Consumption: Curing helps eliminate harmful chemicals and excess moisture, lowering the risk of contaminants and ensuring a cleaner product.
Effective Tips for Cannabis Curing
For beginners, following a few proven tips can make the cannabis curing process much more successful. Here’s how to cure your weed more effectively:
Use Glass Jars, Not Plastic
Glass curing containers help maintain flavor and don’t leach chemicals into your cannabis flower like plastic containers can.
Don’t Overpack the Jars
Fill jars about ¾ full to allow fresh air to circulate between individual buds, reducing the chance of mold growth and preserving quality.
Keep It in a Dark Place
Store curing jars away from light exposure to protect cannabinoids and aromatic compounds from degrading.
Monitor Humidity Levels
Use a hygrometer to monitor humidity inside the jars. Maintain a range of 55–65% relative humidity for optimal curing conditions.
“Burp” Daily in the First Weeks
Open the jars once or twice a day for a few minutes during the first 1–2 weeks to release moisture and allow oxygen in.
Avoid Rapid Drying
A slow cure improves the final result. Rushing the drying and curing process can lock in chlorophyll and reduce overall flavor and potency.
Trim Carefully
Whether wet trimming or dry trimming, removing sugar leaves helps prevent harshness and encourages better airflow during curing.
What to Avoid When Curing Your Cannabis Plants
Avoiding common mistakes during the curing process is key to achieving properly cured weed. Here are things to watch out for:
- Skipping the Drying Process: Placing wet buds into jars traps excess moisture and promotes mold growth.
- Using Airtight Containers Too Early: Make sure your cannabis buds are properly dried before sealing them in curing containers.
- Ignoring Humidity Levels: Without monitoring, humidity can quickly rise or fall, ruining your cure.
- Exposing to Light and Heat: Light exposure and high temperatures degrade cannabinoids and reduce shelf life.
- Opening Jars Too Often: While burping is necessary, excessive air exchange can disrupt the controlled environment.
- Overcrowding the Jars: Stuffing jars full of buds prevents airflow and increases the chance of moisture buildup.
- Neglecting to Trim Sugar Leaves: Leaving sugar leaves on can make the weed taste harsher and slow the curing process.
Final Thoughts
Curing your weed properly takes time and attention, but the results are well worth the effort. From enhanced flavor and potency to extended shelf life and smoother smoke, a slow, controlled cure transforms harvested cannabis into a high-quality product. Stick to the steps, avoid common pitfalls, and you’ll enjoy the full rewards of your cannabis cultivation. To get the most out of your cannabis harvest, consider learning more about drying techniques, storage solutions, and strain-specific curing practices.
Frequently Asked Questions
How do I know when my weed is fully cured?
Your buds are fully cured when they feel slightly spongy but not wet, break apart easily without crumbling, and emit a strong, rich aroma. They should also burn smoothly without harshness.
Can I cure small batches of cannabis?
Yes, small batches can be cured effectively using smaller glass jars. Just ensure proper humidity control and airflow, and follow the same curing principles as with larger quantities.
Is it okay to use vacuum-sealed bags for curing?
Vacuum sealing is not recommended for the curing stage, as it removes air needed for slow chemical changes. However, it can be used for long-term storage after curing is complete.
Can I speed up the curing process with heat or fans?
No—adding heat or forced airflow can dry out the buds too quickly, degrading terpenes and cannabinoids. A slow, steady cure produces the best quality results.
What if my buds feel too moist during curing?
If buds feel overly damp, leave the jar open for a few hours or place them on a drying rack temporarily before sealing again. Always monitor humidity to prevent mold.
Do different cannabis strains need different curing times?
Yes, denser or more resinous strains may take longer to cure than lighter ones. Monitor texture, aroma, and smoke quality to determine when each strain is ready.